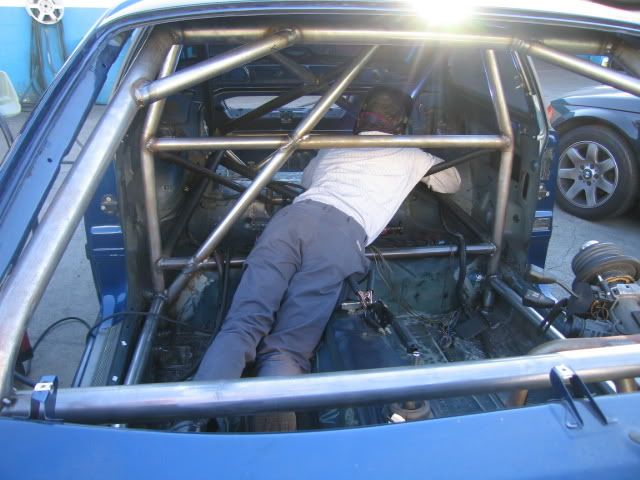
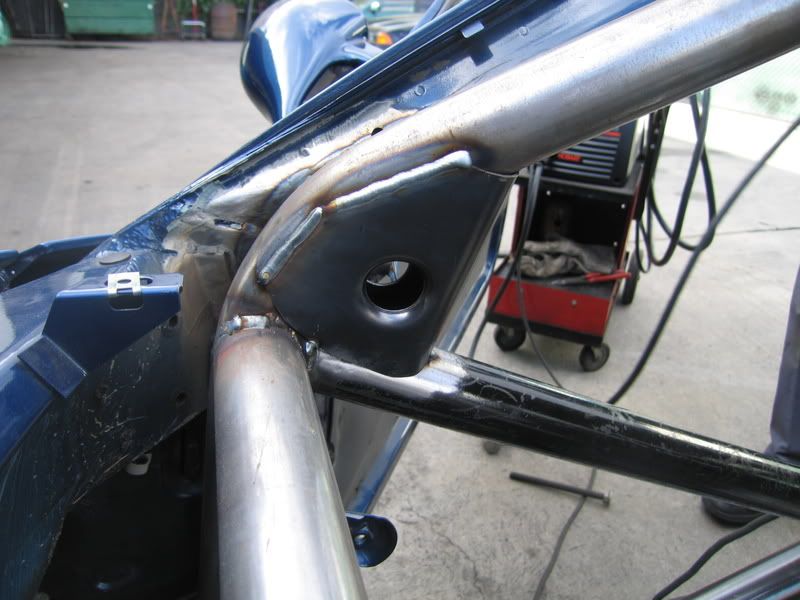
Monday, April 21, 2008

Cage modifications started!

We finally finished my friend Dimitri's '95 M3 NASA TT car. We put quite an extensive cage in it. I think he will put up a Project thread here in a few days.

here's a few pics!


here a video of the completed car...
http://www.youtube.com/watch?v=vey-RcRPa5Q

We sprayed it avus blue like the car.....man painting a cage sucks!

We got the car all back together and it's almost ready for it's first test.

Now that we are finished with his car, he is going to help me with mine. Hopefully we can get my car done alot faster now!

I was able to resist the urge to attend the bmw wheel power meet then go to Long Beach grand prix and instead we worked on the car....

We broke out the sawzall and went nutz!!!

Started to prep the engine bay by removing radiator support/firewall sheet metal and the small firewall at the back of the engine bay thanks to a cool new spot weld drill bit and a nice big sawzall!

The radiator will be moved forward and lean a bit. the engine bay is now huge! You could fit a V8 in there! It will have a fan on the backside of it as well.

Began sanding/grinding down all the old crusty paint in the engine bay in prep for welding and fresh paint.

Removed dash support sheet metal as well. This was done as I will be adding a dash bar to connect to my engine bay tubes. I will be fabricating a new dash.

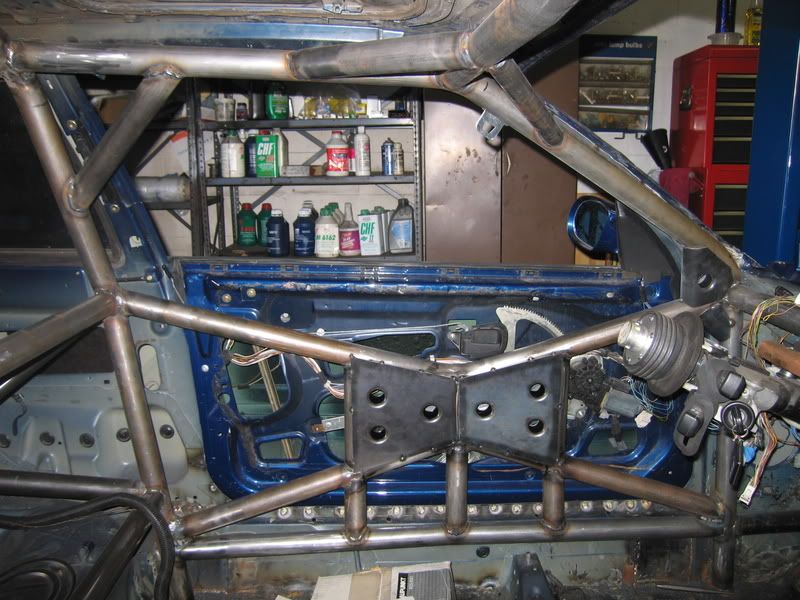
So basically the plan is that I will be adding to my cage alot.

X on the door bars
Bars to tie into the rear subframe
rear strut towers tube and tubes to the diff mount
and finally extending the cage to the front shock towers

...also planed are Tilton pedal setup, mc with brake balance and bias control etc....

oh yeah rebuilding the engine! man...I think I bit off more than I can chew!

Hopefully my good friend Dimitri will lend me a hand and we can bust out all this incredible amount of work!

all the pics CLICK HERE.


I never did paint the engine bay.....

Actually I never touched the whole drive train and engine bay since I bought the car.

So I decided to tackle it all in what I'm calling "phase 2"

-painting engine bay
-reinforcing&restoring all suspension components
-more extensive cage layout
-fresh motor
-new braking "system"
-New and improved dash and wiring.


Thursday, March 13, 2008

SETUP FULL BLOG

My full setup blog,

I have one on the setup forums on the show's website......Click here.
or
you can see my reports with videos on my website HERE.

Wednesday, February 13, 2008

plans.....

I enjoy welding very much, once I got the tig I was practicing alot and gradually got better. I could lay a great bead on a flat practice metal peice but it is only when you have to weld things in weird positions on actually projects that your really challenged. Every time I well I'm getting better.

Last year I raced the British Extravaganza which is on the same weekend as BIMMERFEST. This year the boss said I have to work the show, So if the car is back together it will be in our booth at BIMMERFEST '08.

I'm doing lots of work to the car right now.....still to do is....

-striping the engine bay of the old paint

to do this I have to remove my master cylinder and brake lines and I'm not sure what I'm going to do at this point. I might install a floor mount Tilton pedal setup and brake bias knob.

or just re-install the stock stuff with a tilton bias knob.

also planed....

-Major additions to my basic cage.

I want to extend the cage to the engine bay/shock towers. Adding additional door protection. (X-brace with dimpled gussets). Added bars to connect to my subframe (like on a e30), also bars connecting my rear shock towers to my diff mount. Lastly, adding an X on the rear down bars.

-Painting the new cage bars and engine bay.
-Powercoating all my reinforced suspension parts and install them.

More Major WORK....

I'm rebuilding the motor!

So lots of updates to come for sure!

Tuesday, February 12, 2008

I'm on a reality TV show......no REALLY!

Finally the time has come! I can now talk about it!

The reality show I was on is going to premier next Thursday on speedtv here in America.

Funny enough the was a few BMW racers driving besides me. There was even a 2002 ITB racer from the east coast (The Canzone brothers) naturally we all became friends once we found that we both raced '02's !

You can see my face in the first promo for a sec too.....

watch the promo here....

http://www.setup-tv.com/

BTW- thats me in the gif below in the black hood.....hehe

There will be a new episode each week. 8 total episodes and SpeedTV website says it available on HD.

Still hasn't really sunken in yet that I will be seeing myself on TV.....worse yet that the whole country will too.

I hope they make me look good. I know I didn't make a fool of myself like some did.

I'm so pumped for this I can't wait. Big viewing party at my friends house for sure next Thursday!

We are bound by some serious contracts so I can only talk about whats made public. So I can talk about each episode after it airs......

The stakes are high, the driver talent pool is MUCH higher than season 1 and the action was non-stop.

NEXT Thursday set your DVR to record! Should be a very entertaining 8 episodes!!

BTW.....the cars were Pontiac Soltice GXP (turbo I-4, RWD) 260hp I think and roll cages made by Pratt&Miller....they were alot of fun but I missed my BMW!!!

here is the SETUP thread on bimmerforums
http://forums.bimmerforums.com/forum/showthread.php?t=942076

Saturday, January 12, 2008

Rear trailing arm reinforcements!

Next up : Reinforcing the rear trailing arms.

Now unless you can find yourself a nice new set of boxed Tii arms you'll have to "box" your trailing arms yourself. I seen many other people doing it many ways....I think my design is pretty sweet. and STRONG.

Initially I was going to add an additional bar across the arms but I really do not think it is necessary.

One of the dimple hole line up with the brake line holes for installation.

Once again fixturing/jigging is the name of the game here. The last thing you want is bent reinforced arms that are useless. Welding tends to warp/shrink everything. I found that I actually had to preload or stretch the arms apart so that when I was done I would had the same measurements.

This whole process takes alot of work!!

Remove arms
disassemble arms
sandblast arms
paint arms on the inside
clean arms for welding (grinding)
make template from cardboard
cut gussets from sheet metal
dimple sheet metal
bend/form gusset to control arm curve
secure in place for tack welding
measuring
applying "jig"
measuring
welding reinforcements
Cleanup
Painting

finally re installation!!

wow...trust me it takes alot more time and work to do it than to write this post!

I know what some race shops charge to do this and now I know why.

That said I made 2 pairs and 1 pair is for sale. I will be making more as well and selling them on my site. If your interested in a set email me.

once again if your going to do this yourself be very careful not to end up with bent arms!!!!

see all the pics CLICK HERE.


forming and bending it so that it would fit perfectly flush took alot of time. Alot of back and forth!


I used a punch and dimple "Dimple die" tool I bought from www.tricktools.com. I bought a 1/2 inch press model $40 and a bigger punch model that I used for the trailing arms....$90+

They have many a few different types. I bought the one that after drilling a pilot hole you bolt the two halves together and by using a air gun as it brings the two halves together it also punches the hole! You can also and preferable do this using a Press. You keep pressing the Die together until your gusset is nice and flat again. If you do it correctly you should end up with a nice flat gusset with dimples on it.

I used 16gauge sheet metal.


Tuesday, December 18, 2007

Solid rear subframe "bushings"

Fabricating solid rear subframe bushings....

First you have to completely remove the rubber from a stock bushing. I did this by drilling out most of the rubber on my drill press then using a dremel.

then you have to fabricate the to endcaps

then you have to correctly position and weld the central insert/bushing

You can get these ready made from Ireland Engineering...for $125

Worth every penny if you can afford it. As this project too a good amount of time...

I too broke and well I have all the tools and did a pretty good job with the tig welder if you ask me!

see all the pics CLICK HERE.


Wednesday, November 21, 2007

Front control arm reinforcement!

Reinforcing the front control arms...

Seeing as BOTH of my front control arms were bent....some reinforcing was in order.

Now I have seen many racers do this to their arms. I've seen some stitched and some with 1 plate added. I did one better and stitched the arm and added plates. Each plate once dimpled only added 6oz. so total weight gain in this crucial unsprung weight area was 12oz per side....not bad I think....

Stock control arm sand blasted = 2lbs 5.5oz
Gussets (dimpled) =6oz each
complete welded assembly = 2lbs 12.2oz

....plus they look kick ass! don't you think? worthy of a baja trophy truck!

click here for all the pics...